Helpdesk
¶ About Helpdesk
The Helpdesk is a tool to quickly send any requests, ask questions, or report problems. All tickets* are promptly received and processed by our support team.
*Ticket — any customer request submitted via the Helpdesk.
Contact the Helpdesk for any financial information or technical assistance. We ensure your uninterrupted communication with our support team 24/7 to solve any issue related to our services and products.
A Helpdesk ticket can be created directly from the Helpdesk section of the client platform. Requests to extend or modify the services provided can also be submitted to the Helpdesk from the following product sections: Video CDN, Anycast CDN, Kubernetes, Cloud Servers, and Load Balancer by invoking the Helpdesk request window using the context link.
¶ Helpdesk General Overview
To access the Helpdesk section, select it by clicking on it in the left navigation bar of the client platform.
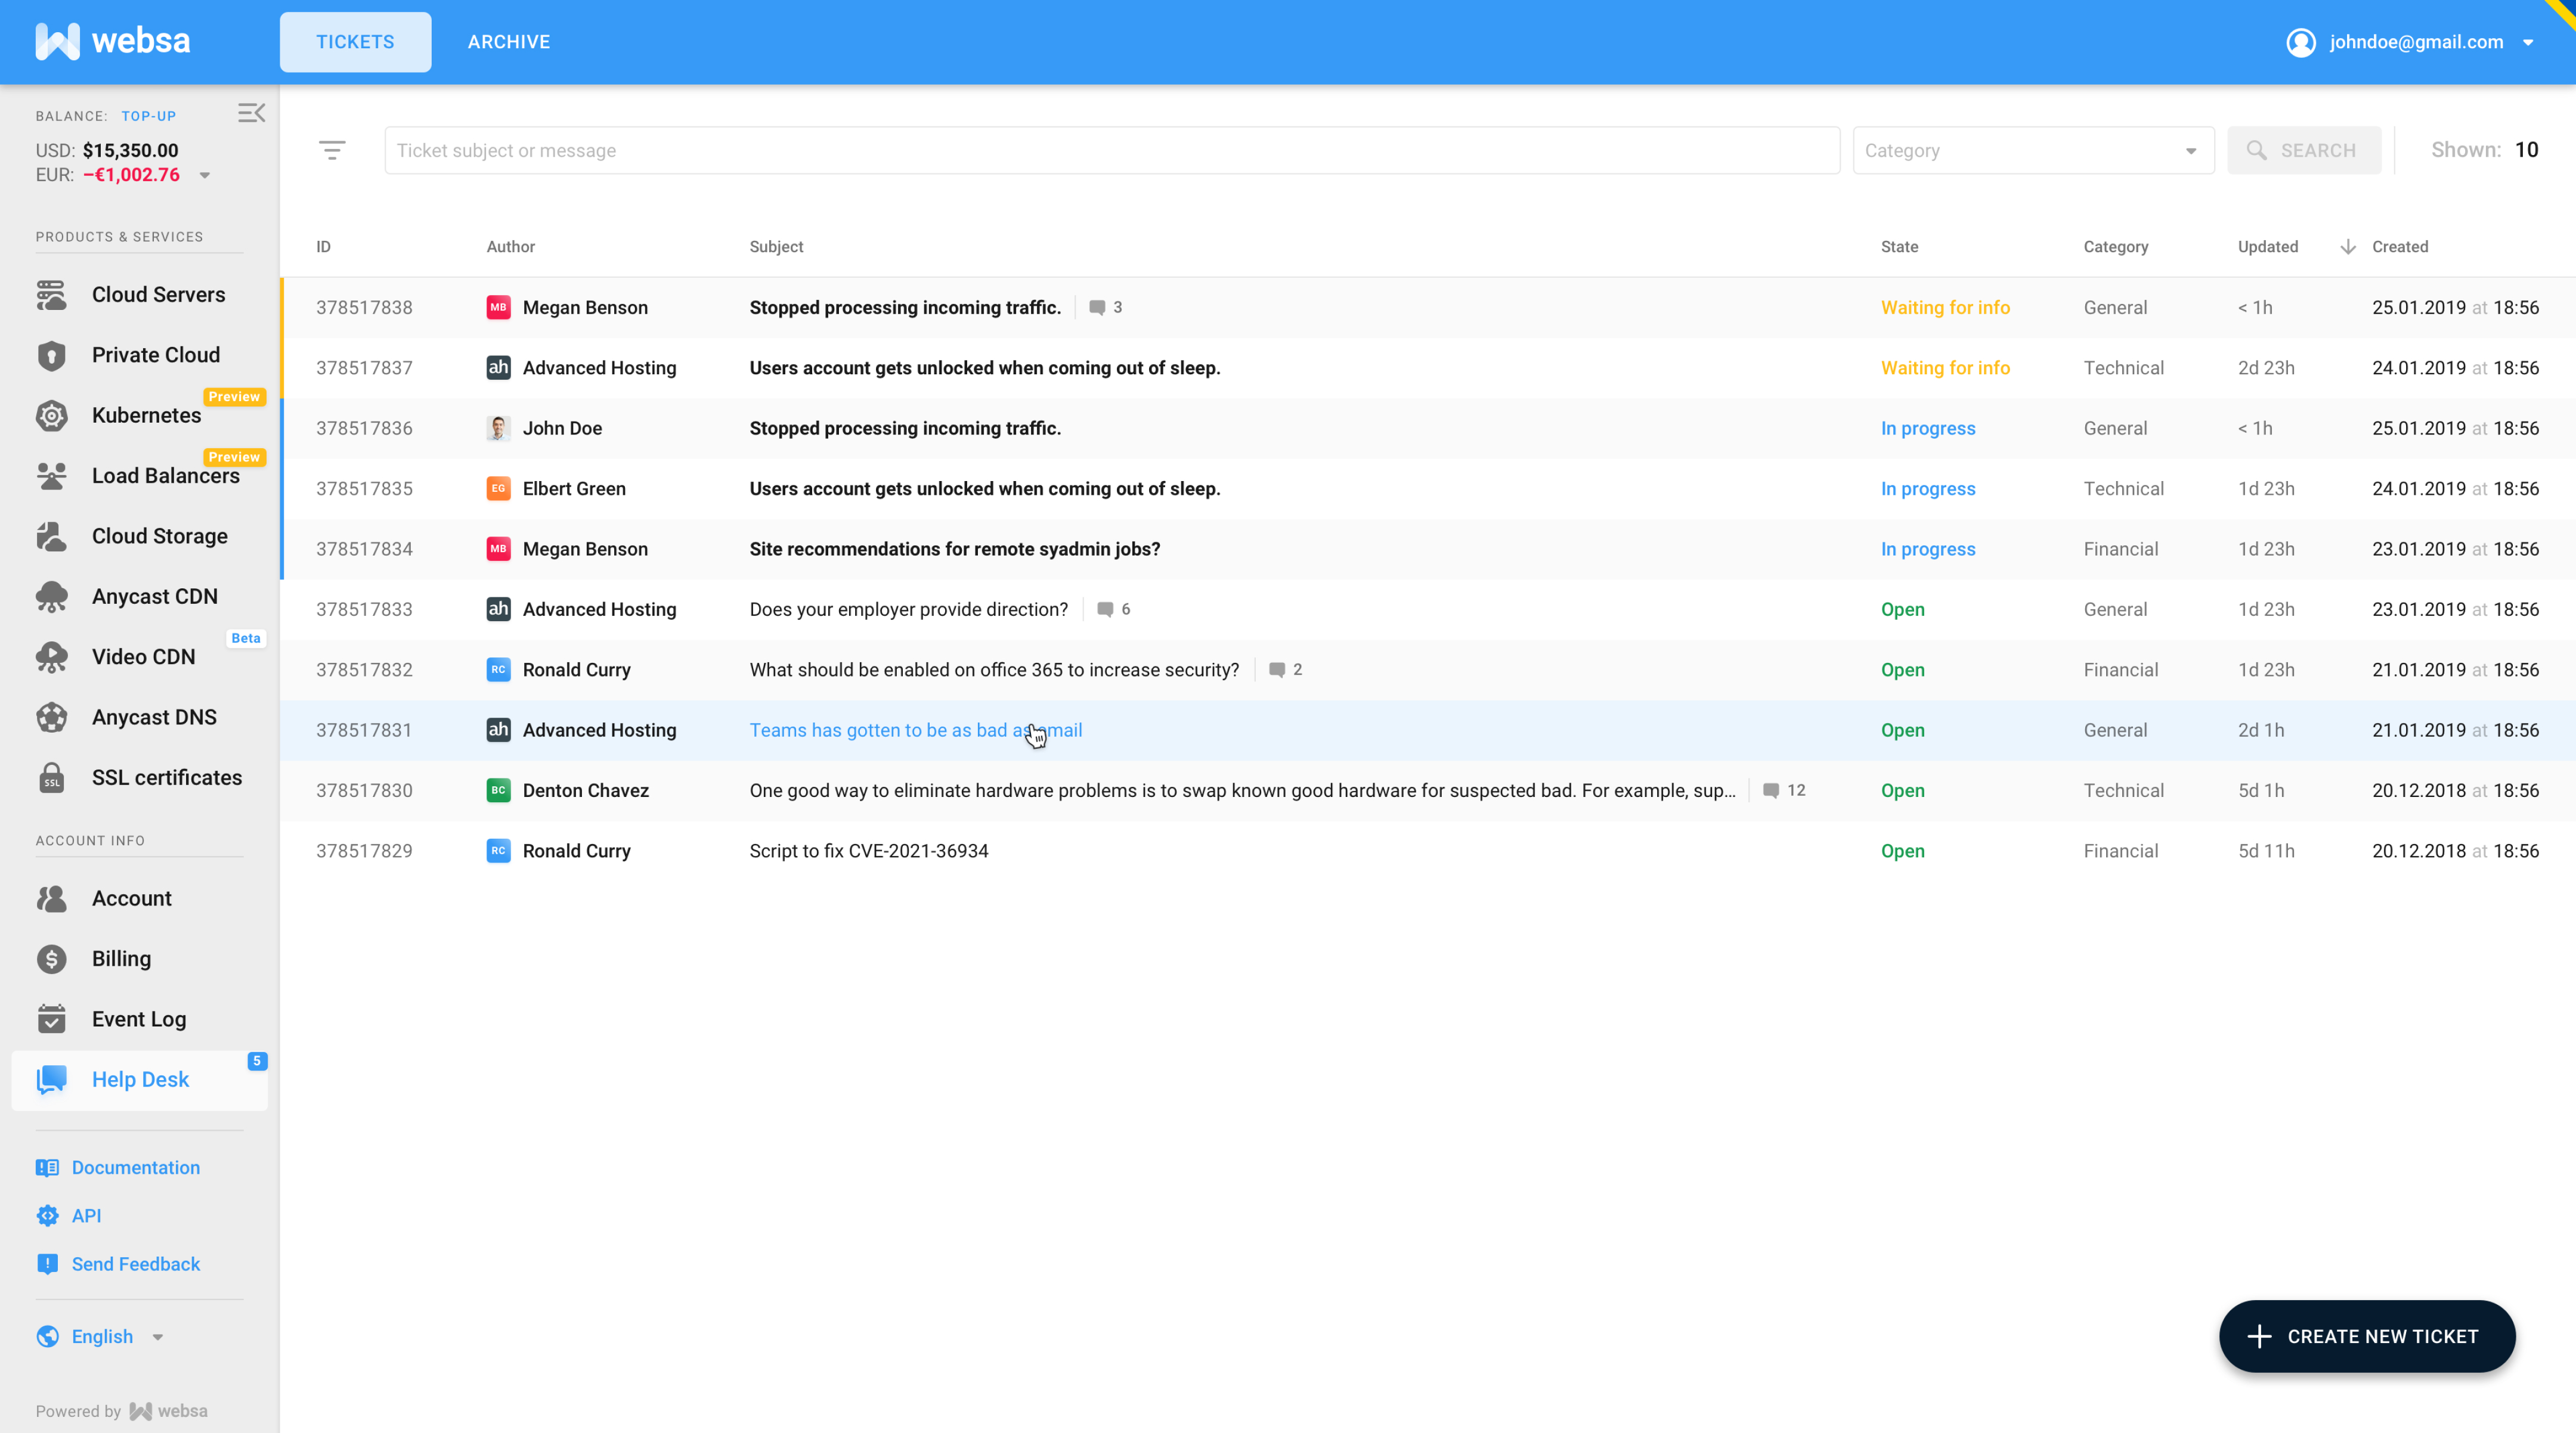
The Tickets tab provides a complete list of your active (not closed) tickets, with ticket ID, author, title, current status, and category.
In the header row of the tickets list, you can sort the list by the update date.
Clicking a ticket’s row will take you to the ticket’s page with your original request and all subsequent comments. You can also add a new comment on the topic and attach files.
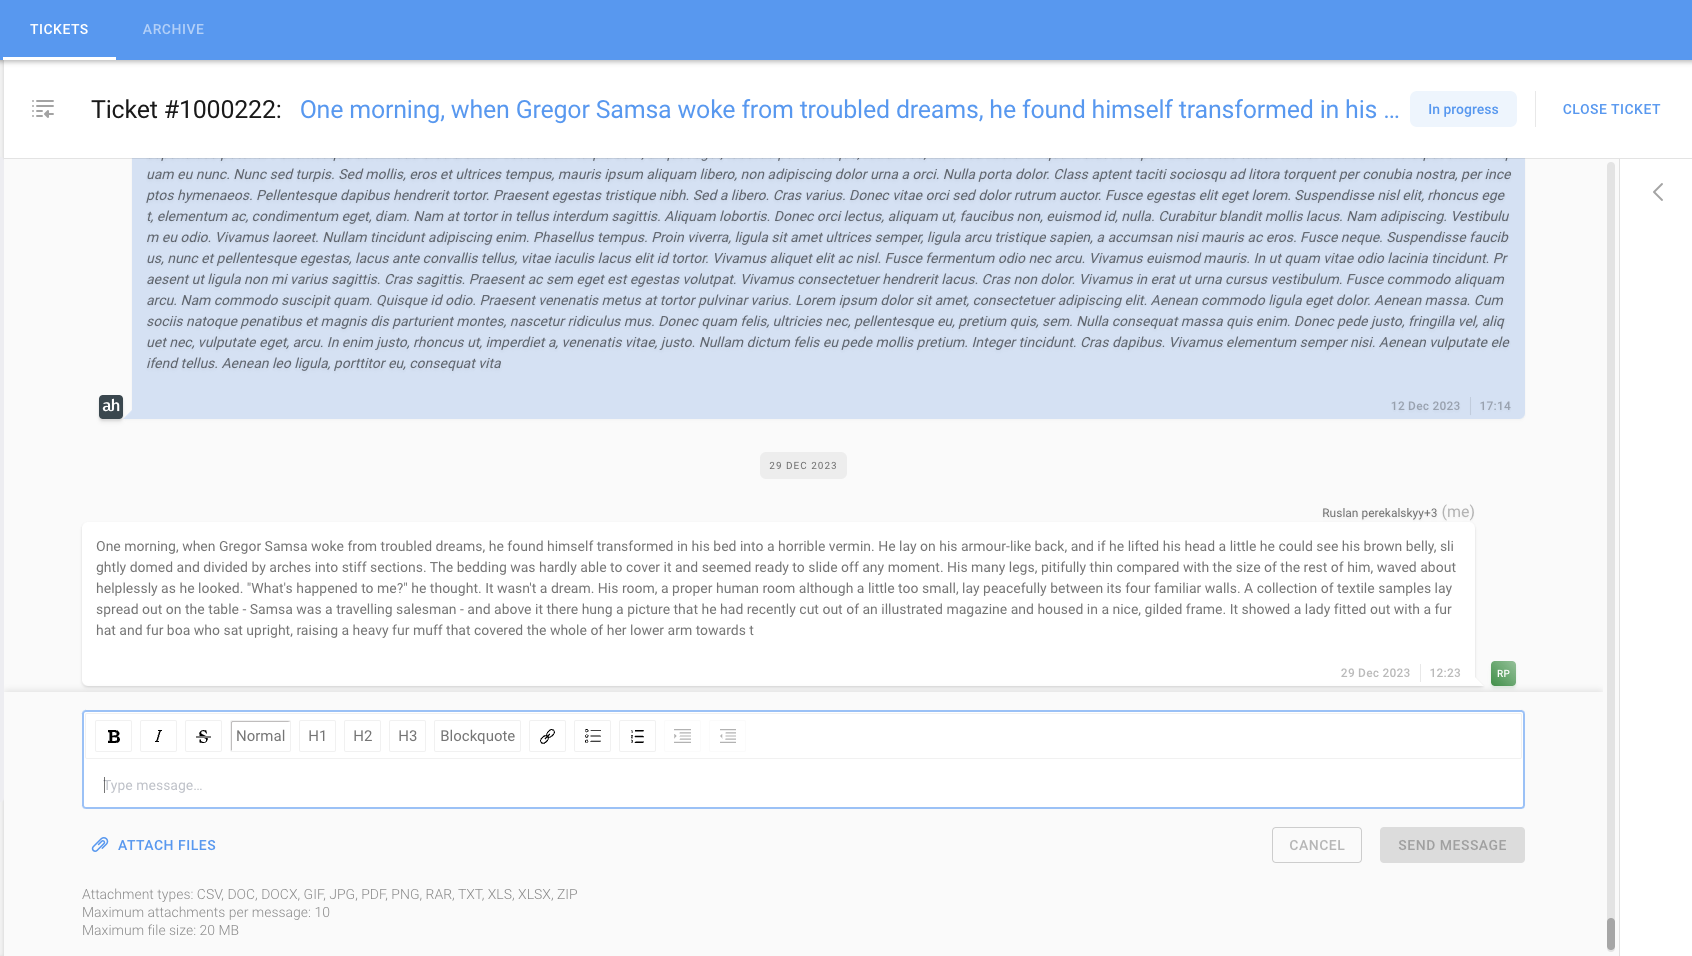
On the Archive tab, you have access to all tickets already solved and closed. Any of the archived tickets can be reopened if needed.

¶ Ticket Creation
If you don’t have any tickets, you’ll see a ticket creation form when opening the Helpdesk section.
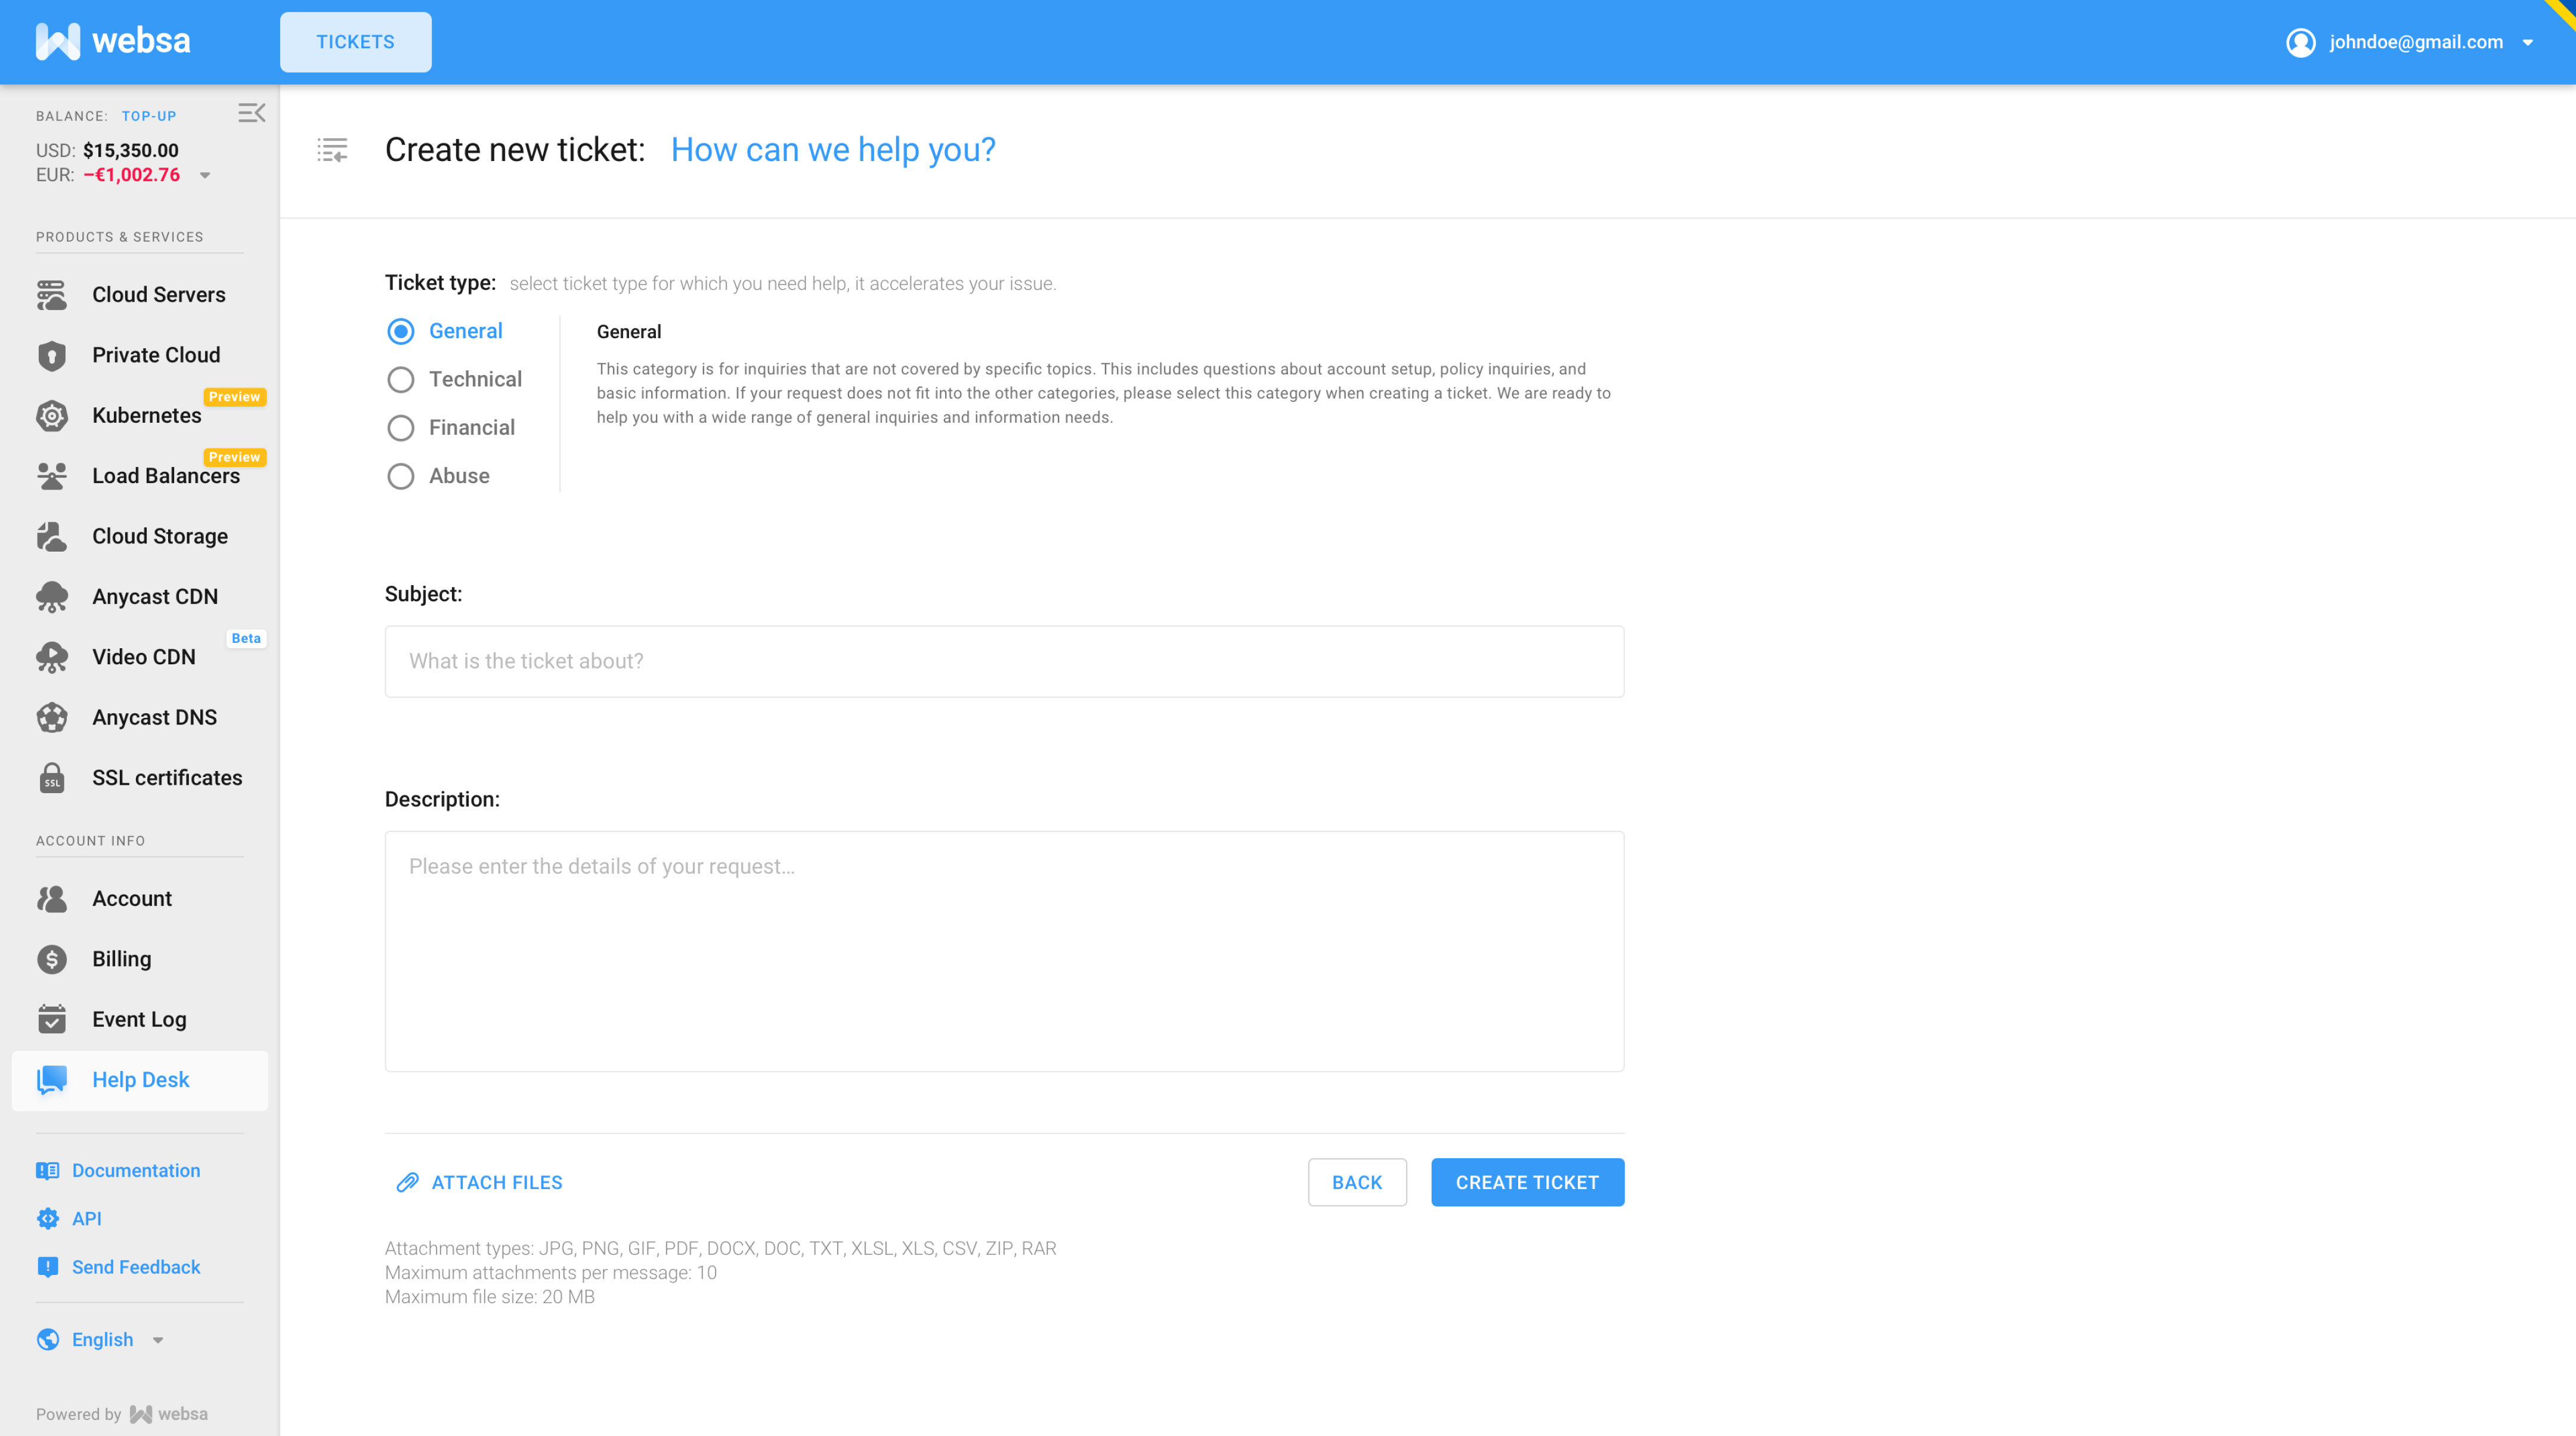
Select the appropriate category for your request in the Ticket type field. This will help our support team process your ticket faster. Be sure to fill in the mandatory Subject and Description.
Please note that you will be able to submit a ticket only after filling in the Subject and Description.
If necessary, add explanatory files to the ticket. To attach files, click Attach Files under the text field with your request description and upload files from your device.
Click Create Ticket to send your request to our support team. Once you submit the ticket, it will appear under Tickets in the Helpdesk.
¶ Attaching Files
Files can be added to a ticket both during the creation process and at any stage of its processing, as well as to a closed ticket with its simultaneous reopening. Files can be added to a ticket by any user on your end and by our support team.
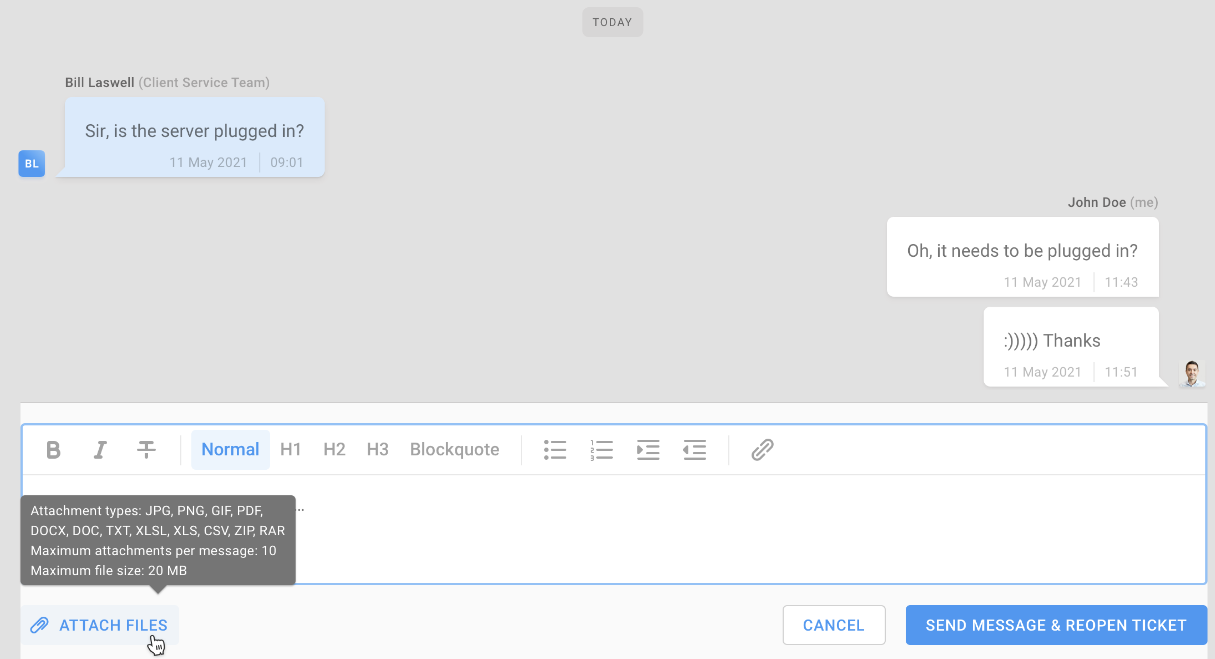
To add a file to an existing ticket, click on its raw to open it, go to the comments box, click Attach Files under the text box, upload the required files from your device, and click Send Message.
If you are attaching a file to a closed ticket — add a message with an explanation and click Send Message & Reopen ticket.

The attached files shouldn’t exceed 20 MB each (10 MB for .jpg and .png files). A maximum of 10 files can be attached in one message.
¶ Allowed file formats
.jpg, .png, .gif
.pdf, .docx, .doc, .txt
.xlsx, .xls, .csv
.zip, .rar
¶ Attachments Download and Preview
To download or view any files attached to a ticket by you, another user on your end, or the support team, hover over a file in the ticket to reveal the preview and download buttons, as shown below.
.png)
Click the corresponding button over the attachment in question. Depending on your selection, the file will either download to your device or open in preview mode in the same tab of your user panel.
¶ File Preview
.png)
In the top panel of the preview window, you’ll find the attachment’s name, the download button (highlighted in blue on the picture above), and the button to close the preview window in the upper right corner. The preview window’s bottom panel lists the total number of attachments for the current ticket in the left corner, along with the file upload date and size.
¶ File Download
.png)
When you press the download pictogram in the ticket or in the preview window, your browser will download the attachment to your device, as shown above. You can access the downloaded file from the list of your current session’s downloads and in your default download folder.
¶ Ticket Overview
To open a ticket, click on its row in the Tickets tab. On the ticket page, you can access your original request, all comments, and attachments. Here, you can read messages from other users on your end and from the support team, add your own comments, and see additional information about the ticket. To expand the additional information panel - click the arrow in the top right corner of the ticket page.
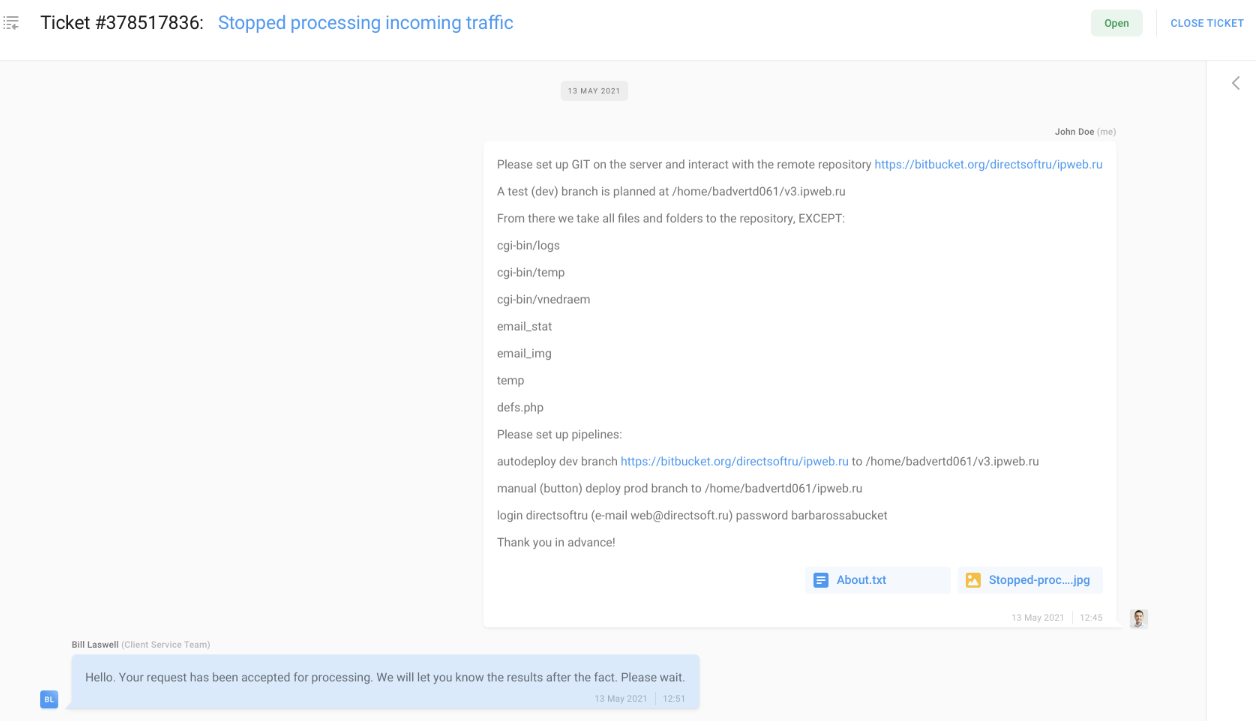
Additional information about the ticket category, author and assignee, creation, and last update dates will be displayed as shown below:
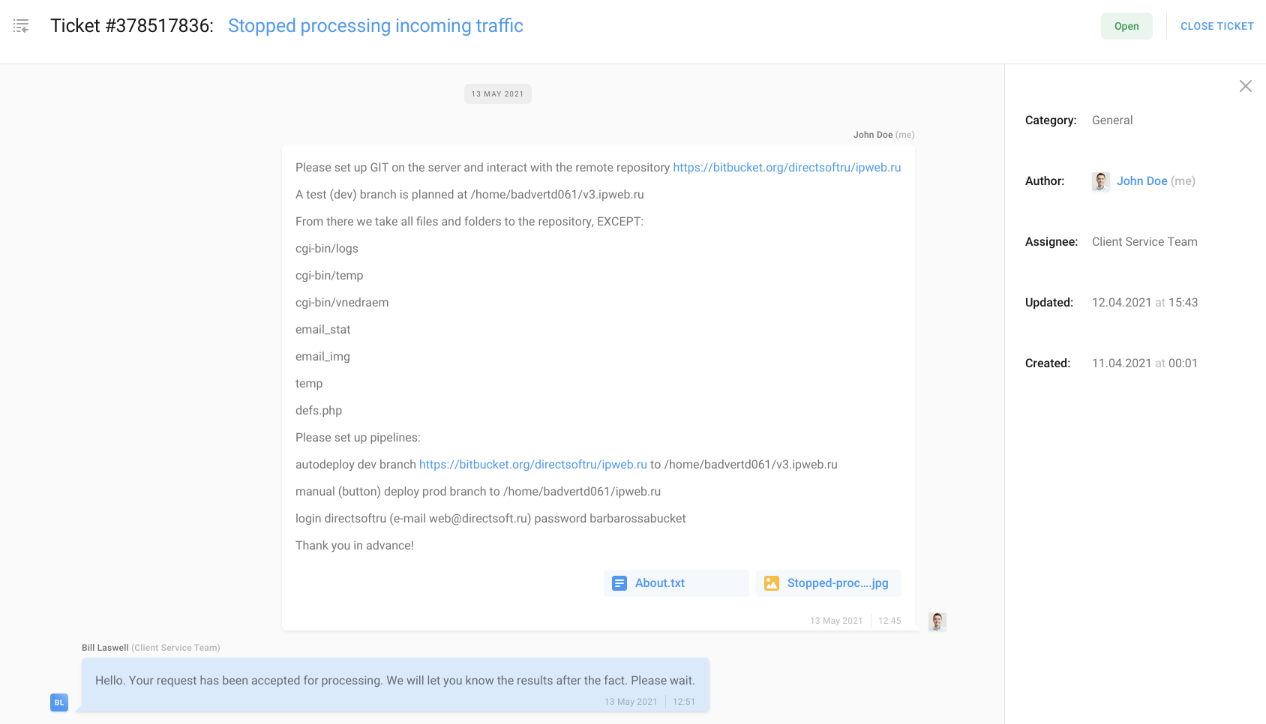
Additional information panel can be collapsed by clicking “x” in the top right corner.
¶ Tickets Access
Any ticket in the Helpdesk section can be accessed by all users on your end logged into the client platform. They have access to view the tickets, comment, and attach files; they can also close and reopen any ticket if needed.
All Helpesk additional notifications are displayed to users individually.
¶ Ticket Progress Tracking
¶ Status
Tracking the progress of your ticket is very convenient with its current status.
Every ticket is created in the Open state. As soon as the support team takes it up, the ticket’s status will change to In progress.
All resolved and closed tickets are moved to the Archive section and have Closed status.
Please note the Waiting for customer status. The support team will mark the ticket as Waiting for customer if additional information or your decision is needed to proceed with the ticket. You will receive a notification in your work email if the ticket is assigned the Waiting for customer state.
¶ Helpdesk Notifications
While the ticket is being processed, you will receive notifications from the Helpdesk about the following events:
- Our support team has added a new comment to a ticket.
- The support team has moved an existing ticket to “Waiting for customer” status. (This status requires your attention and/or action from your side).
- A new ticket has been created for you by the support team following your request.(Such ticket will be instantly marked as Waiting for customer).
- The support team has closed the ticket. (You can reopen a closed ticket if necessary).
All your users involved with the ticket (by commenting or adding files) will receive the above notifications.
¶ Additional notifications
When a new comment is received from the support team, the ticket’s line in the Tickets tab will be bolded.
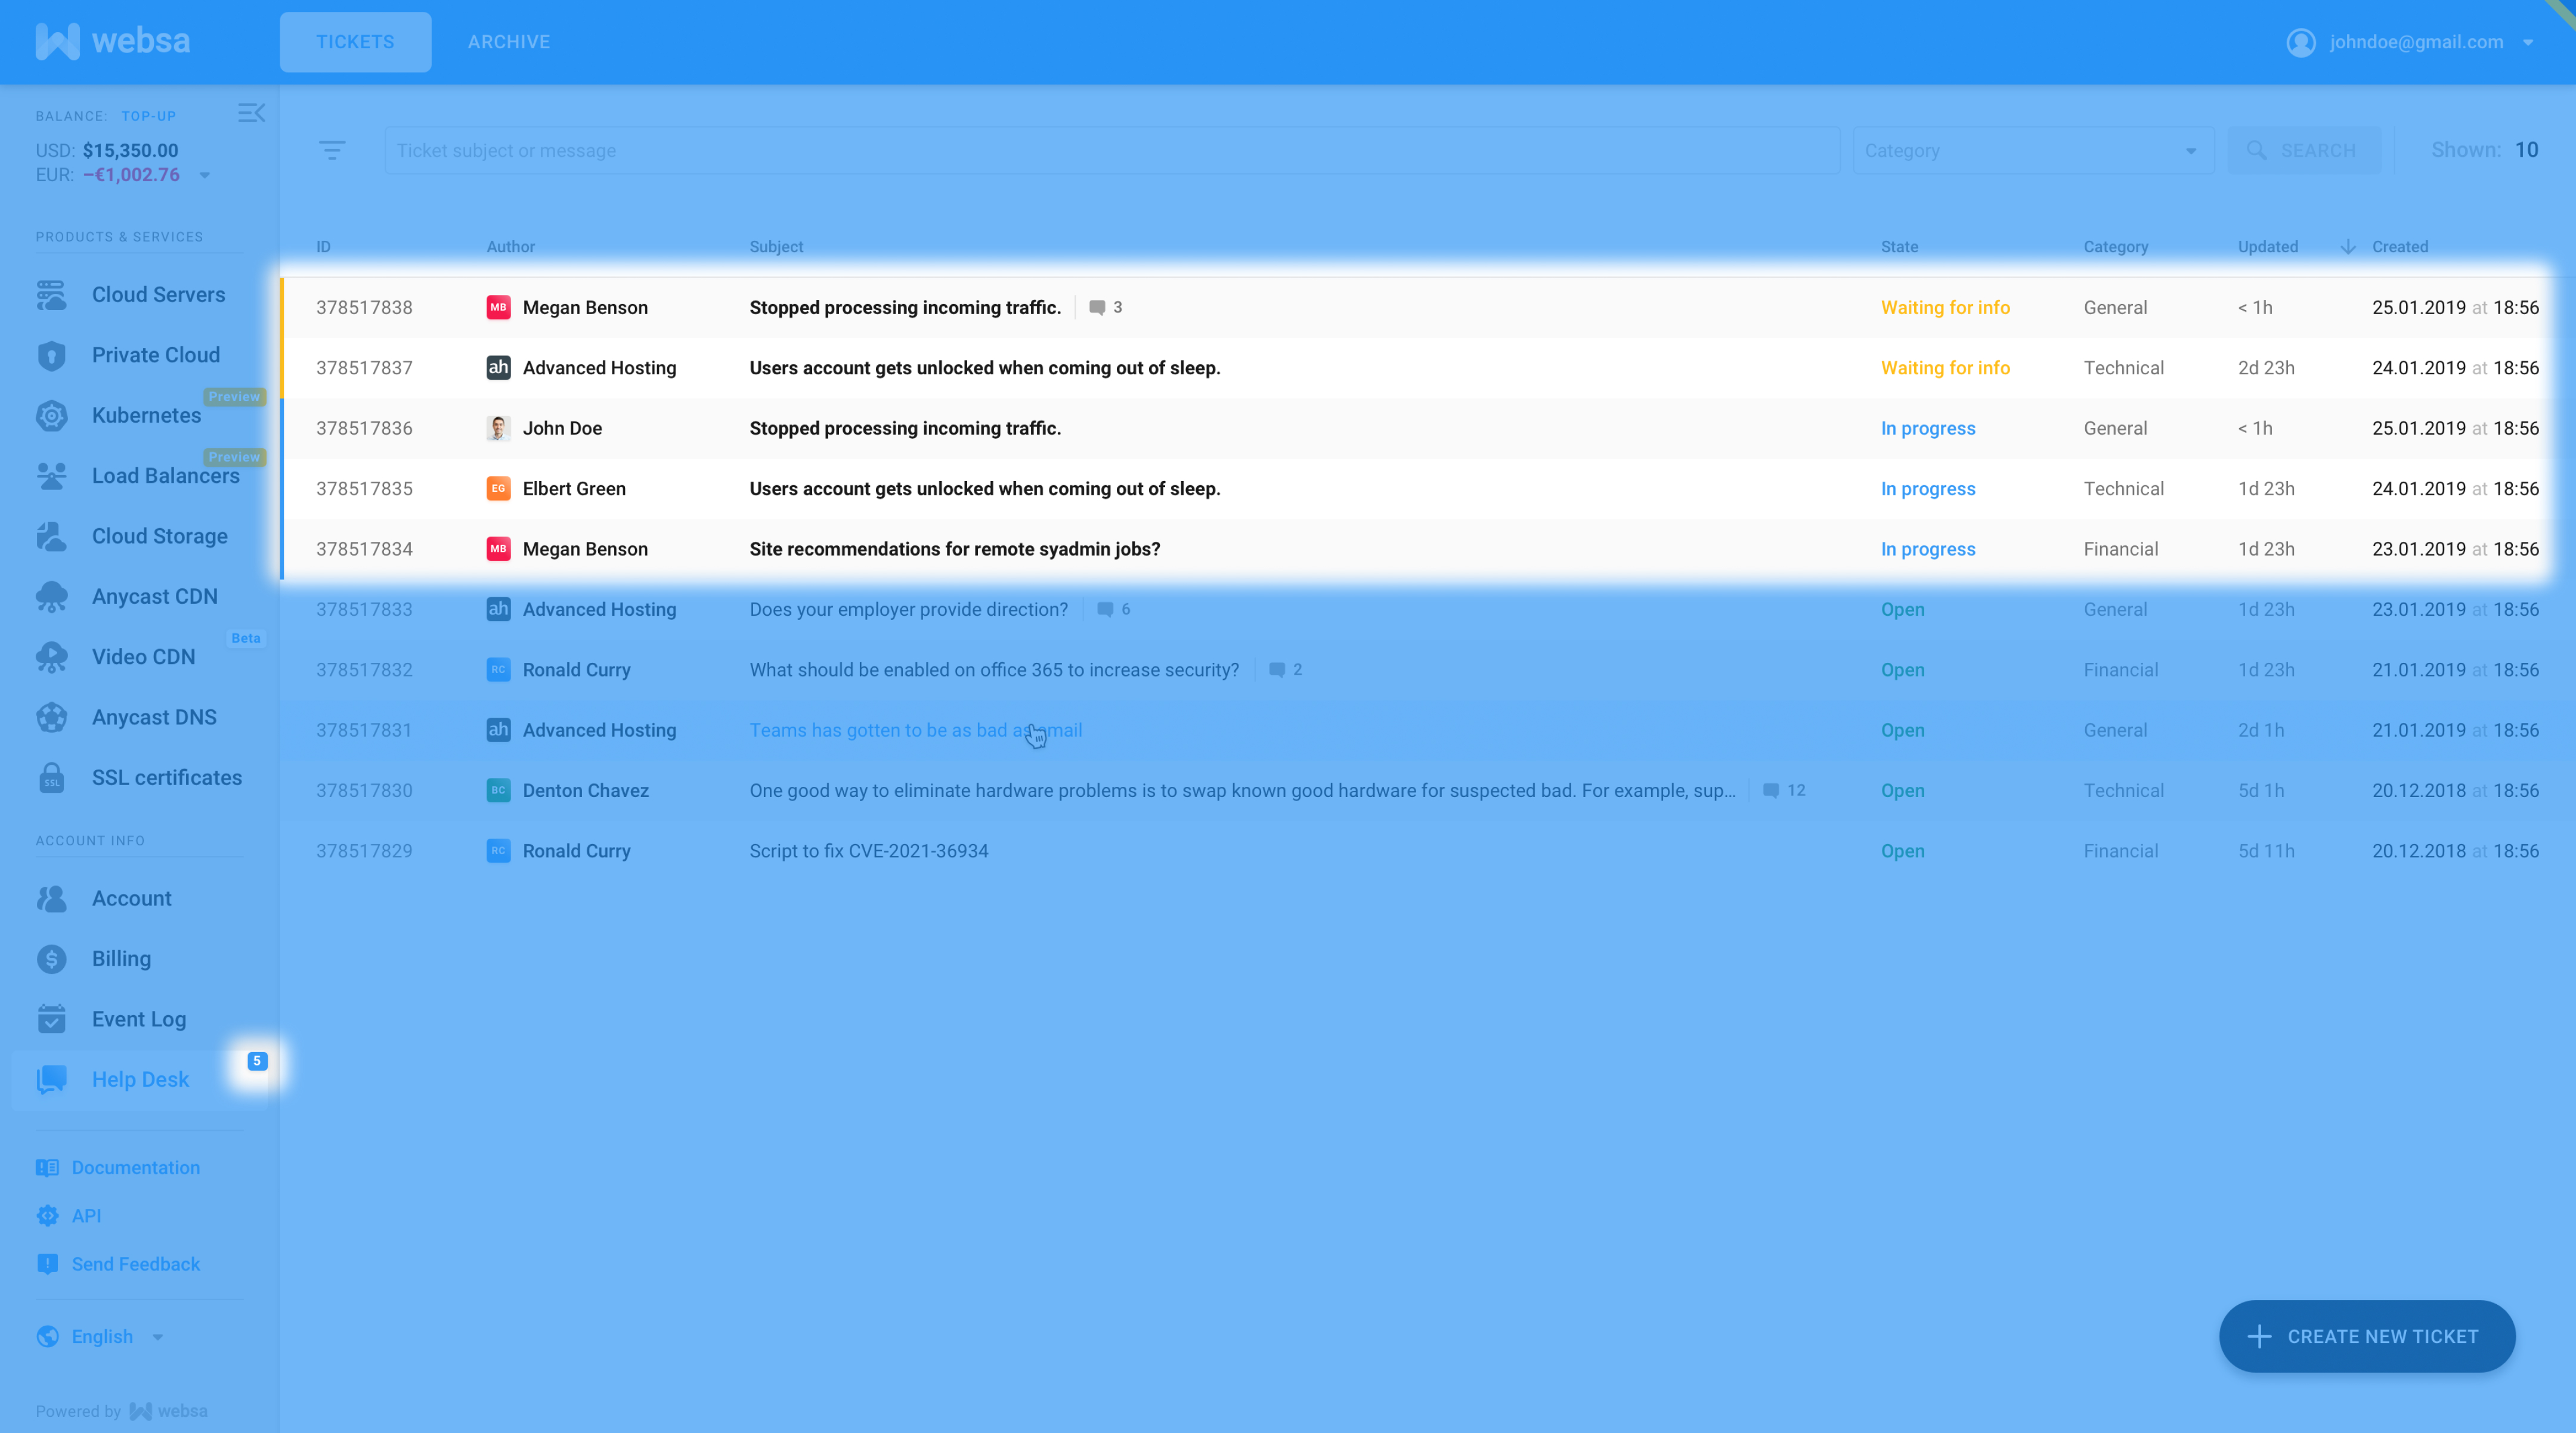
An additional counter displays the number of tickets requiring your attention (Waiting for customer status) on the left navigation bar visible from all sections of the client panel, as highlighted above. This will allow you to track such tickets and address them first.
¶ Tickets Search and Filters
¶ Search
Use the search box to find a particular ticket. You can search by the topic and description of the request, comments, or the author. To do this, enter your query in the search box at the top of the page listing active or archived tickets and press Enter or click on the search pictogram within the search box.

¶ Filter by Category
If necessary, you can filter your tickets by category to display only the tickets that interest you at the moment. To do so, click the filter pictogram preceding the search box and select the category in question.
¶ Sort by Updates

By default, tickets are sorted from the last update and down. By clicking on the arrow next to the Updated column in the header of the ticket table, you can sort tickets by the last update time. When sorting from the most recent update to earlier ones is applied, the arrow will point down, and the topmost row will show the ticket with the most recent updates. If you press the arrow again, it will point up, and the tickets will be sorted in reverse order; the ticket with the oldest updates will be at the top.
Sorting by ticket creation date works identically; the sorting arrow is located in the Created column in the header table row.
¶ Closing a Ticket
By clicking Close ticket at the top right corner of the ticket page, any of your users can close a ticket in any status. After clicking Close ticket, you will see a modal window to confirm closing the ticket.

After confirmation, the closed ticket moves to the Archive tab and will be displayed there. It will no longer be possible to leave comments on the ticket, and its status will change to Closed.
¶ Reopening a Ticket
Any of your users can reopen a ticket by clicking Reopen ticket inside a closed ticket page.

After clicking Reopen ticket, a new comment field will open at the bottom of the ticket’s page; only after adding a new comment and clicking Send message & reopen ticket will the ticket be reopened.
The Send message & reopen ticket button will remain disabled if the message is empty.

After reopening, the ticket will be moved to the Tickets tab, and its status will change to Open.