Anycast CDN Resource Settings
Numerous additional settings are available via the API.Couldn’t find what you need? - We might have it, ask our Helpdesk!
For each Anycast CDN resource, you have access to following settings and information:
- General information overview
- Resource statistics
- Domain management
- Content delivery settings
- Content access
- Anti-hotlinking
- Cache configuration
¶ Resource list
To view a list of your Anycast CDN resources, detailed information about each of them, and to check or change the settings of a selected resource, go to the CDN resources section.
Here you can view all of your resources, or filter out a particular resource or group of them based on ID, name, source, domain, or current state by using the filter in the page title.
.png)
If the filter is left blank, all of your resources will be displayed in a list view, including information about related domains, each resource’s source, state, and last update date immediately available for each resource, as shown above.
Click the column name in the list title to sort your resources into the appropriate category for easy reference.
To display full information about a particular resource and access its settings, click on its name in the list.
This will take you to the page of the selected Anycast CDN resource, where the following tabs will be available:
- Overview - overview data of the resource and general stats widgets
- Statistics - detailed resource statistics with filters by periods and domains
- Domains - resource domains customization page
- Preferences - page of content delivery settings
- Access Protection - resource access settings page
- Manage Cache - cache configuration page
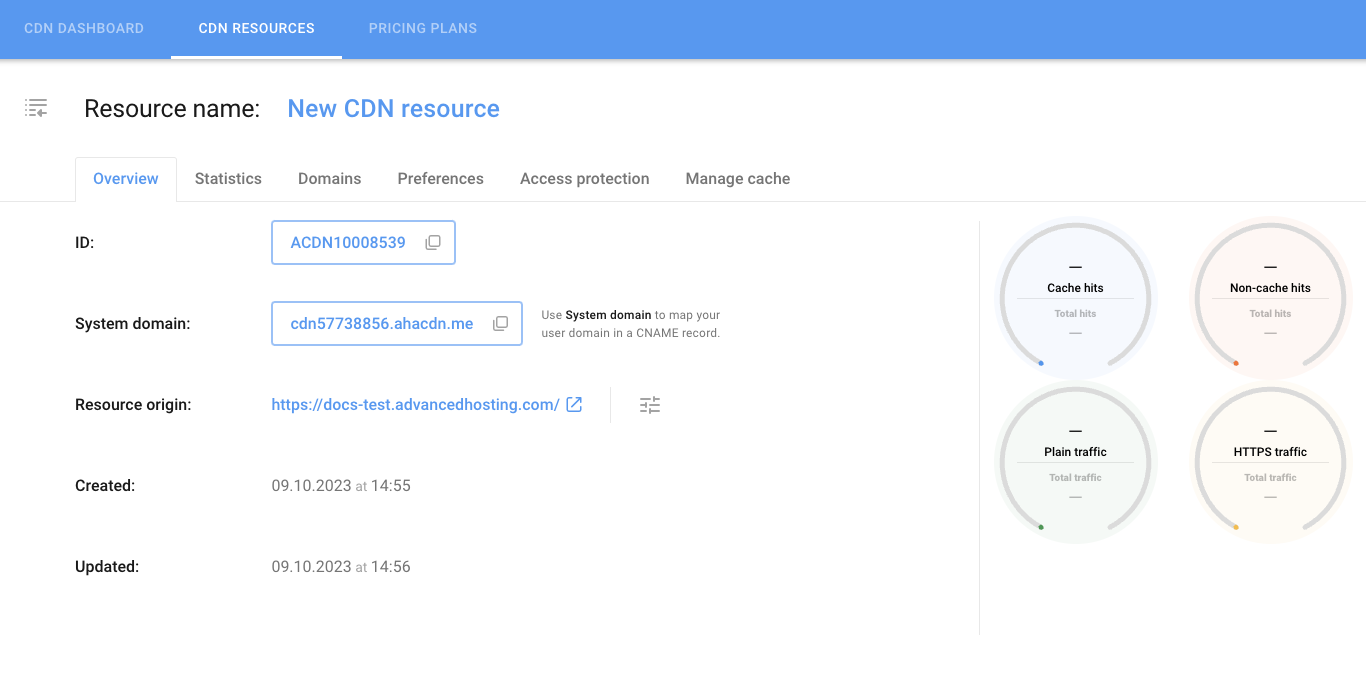
¶ General information overview
You can view the general information for the selected Anycast CDN resource on the Overview: tab
In the general information section you’ll find the following data about the selected resource:
- ID - internal resource identifier of within the CDN
- System domain - domain created by the system to access the resource files
- Resource origin - resource directory, http(s) link, source or bucket address
- Created - date and time of the resource creation
- Updated - date and time of the last update of the resource
The right side displays widgets of statistics for this resource:
Note, the widgets will display information as statistics about the resource usage are collected. Immediately after the resource is created, the widgets will be empty.
- Cache hits - number of times cached file was accessesd via the CDN
- Non-cache hits - number of times not cached file was requested and proxied by the CDN to the origin.
- Plain traffic - HTTP traffic statistics for the resource
- HTTPS traffic - HTTPS traffic statistics by resource.
¶ Resource statistics
The Statistics tab provides detailed data on traffic consumption, average bandwidth, cache volume used and hits (number of times your file has been accessed).
By default, you’ll see stats for the current month. More detailed statistics are available on the Anycast CDN Dashboard.
The traffic graph is divided into normal (HTTP) and HTTPS traffic. Hybrid graph combines traffic and hits data.
.png)
For more details on calculating bendwich at the 95th percentile, read article on traffic calculation.
Using the calendar filter, you can set a specific period for displaying statistics as shown below.
¶ Response codes
.png)
Traffic response codes provide insight into the processing of user requests and the delivery of your content. Each response is explained below:
MISS: The CDN cache did not contain the requested file, so we fetched it from the origin and cached it for later use.
BYPASS: The CDN skipped caching the request according to directives from the origin server or specific rules.
HIT: The CDN served requested content directly from the cache.
EXPIRED: The origin served fresh content because the cached content was out of date or had exceeded its TTL.
REVALIDATED: Before serving, CDN validated cached content freshness without fully re-downloading from the origin.
STALE: Although outdated, the cached file was served due to the origin server’s incorrect response; once available, the CDN fetches a fresh file from the origin.
UPDATING: Content was stale, as the CDN was fetching a fresh file version from the origin server in response to the previous request.
¶ Resource domains
Information about the resource domains is reflected in the Domains tab:
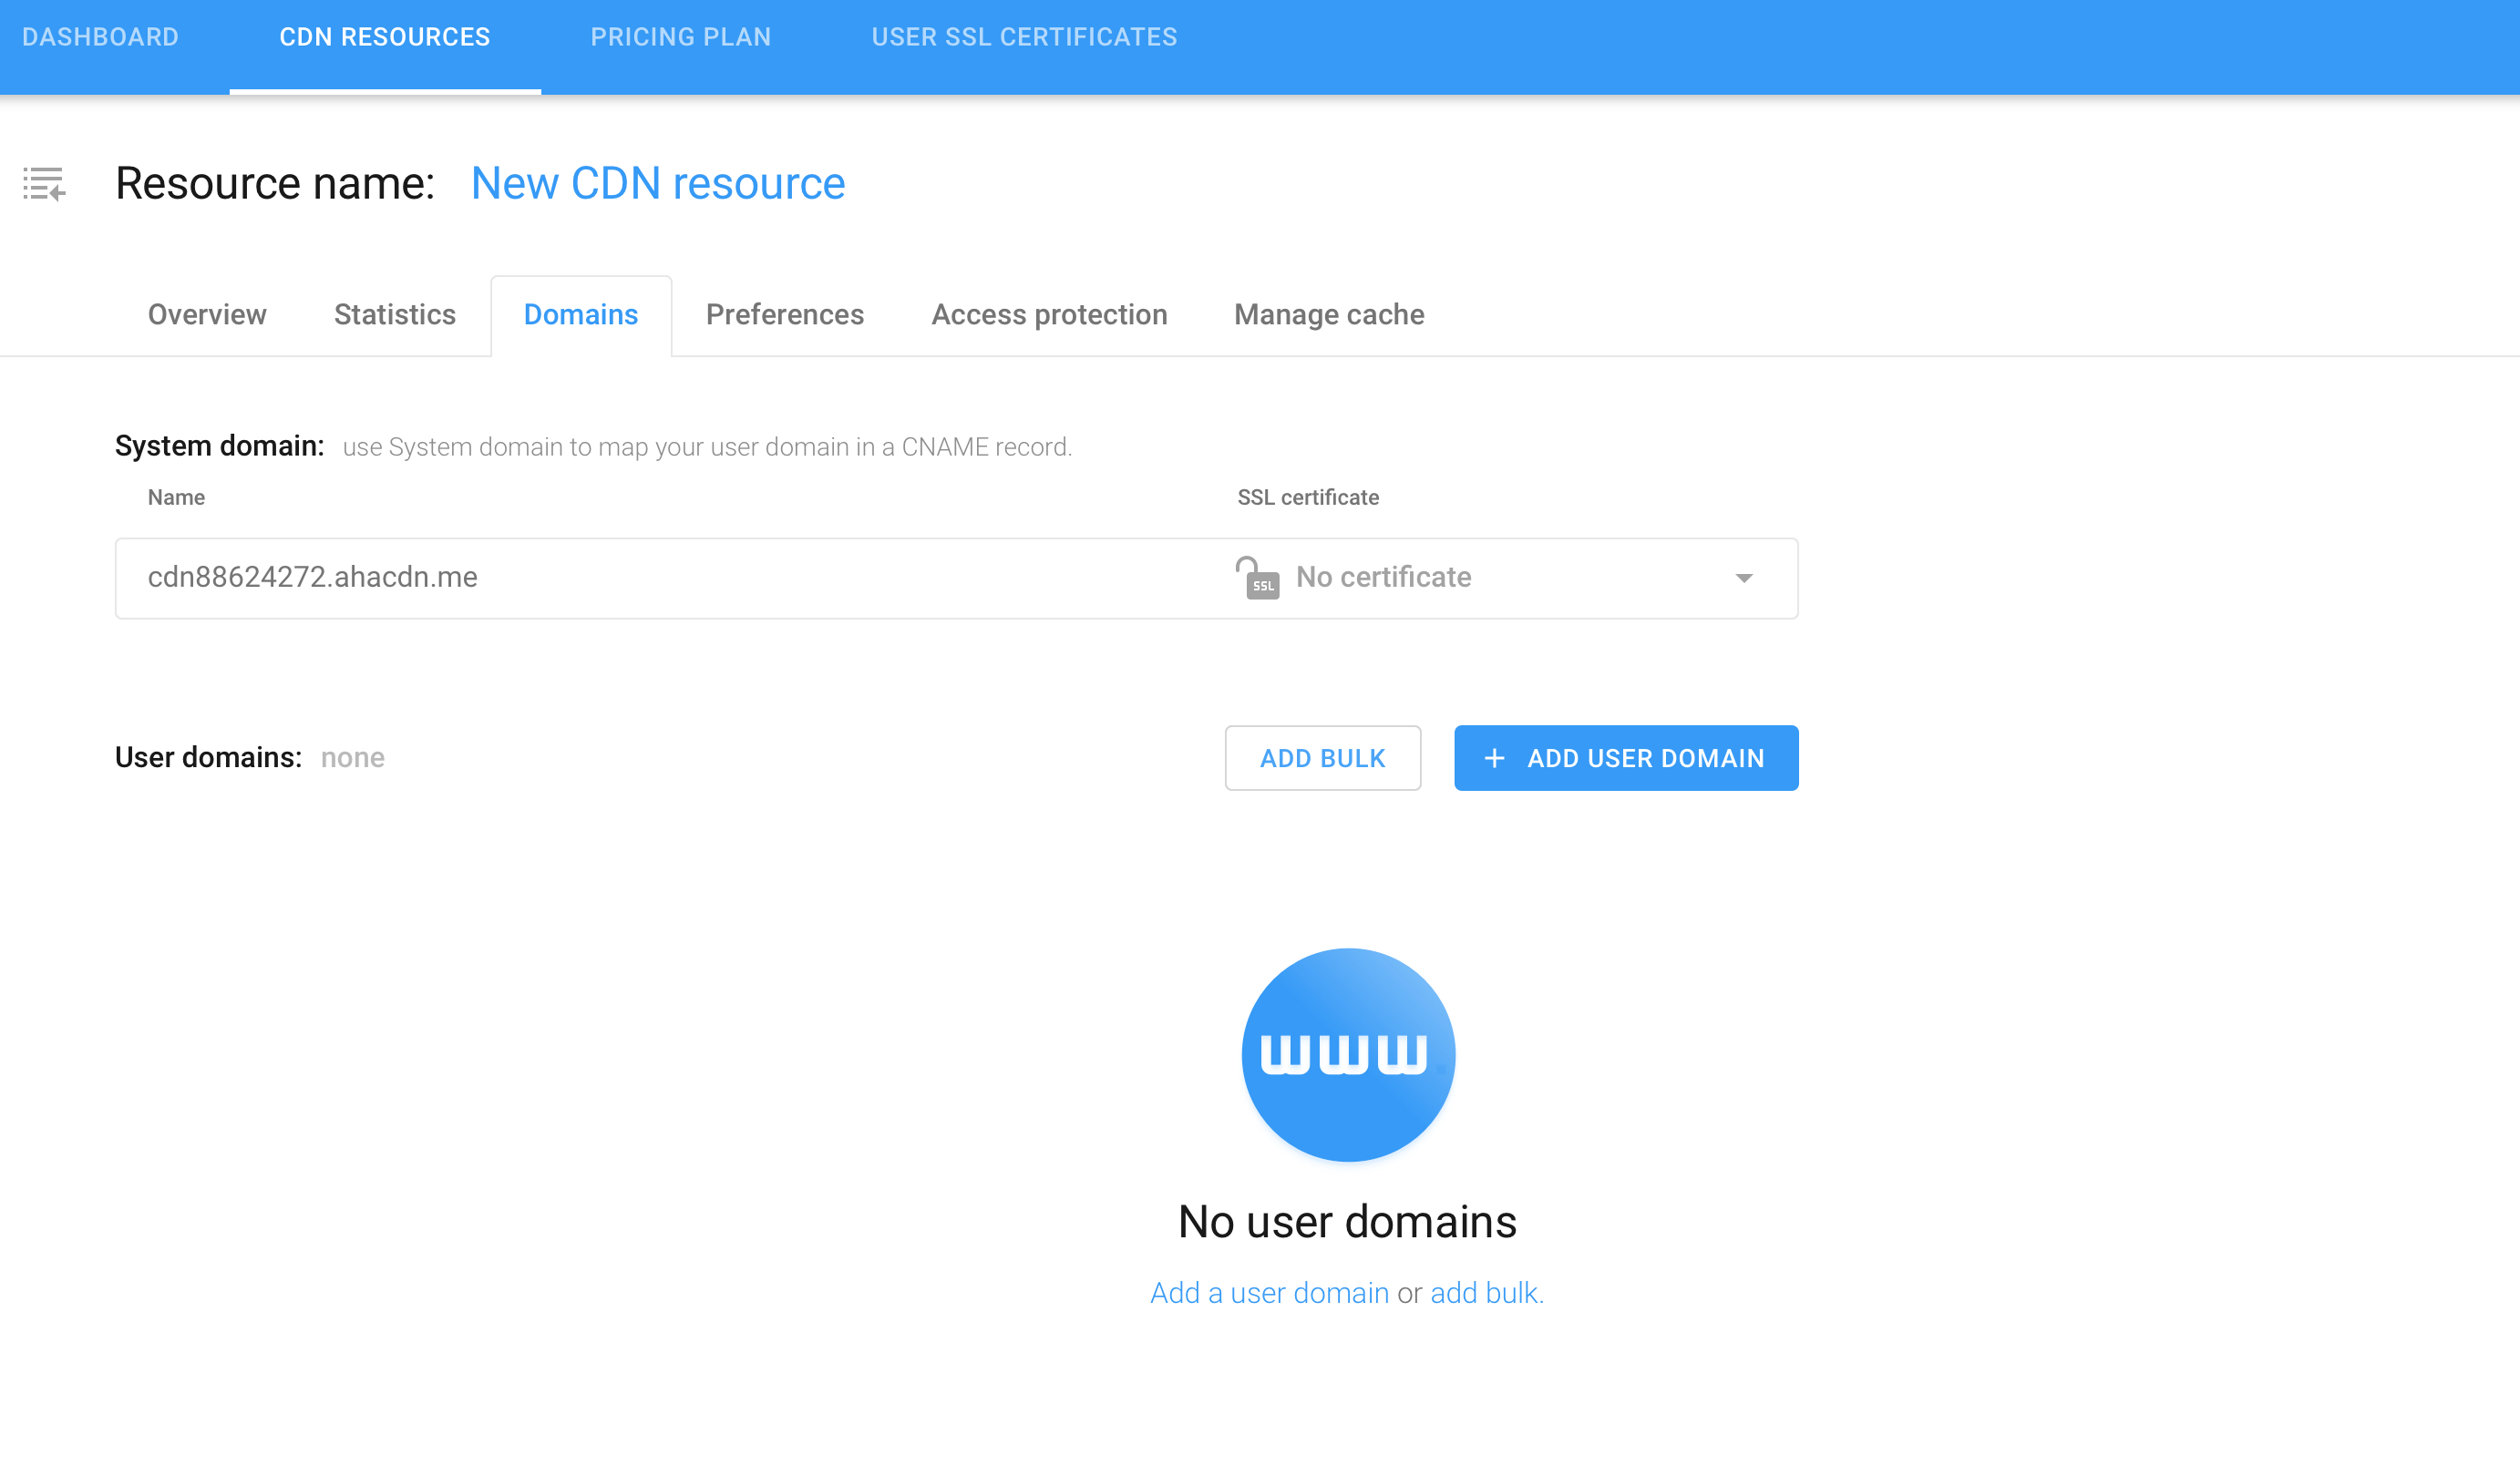
Here you will find two types of domains:
- System domains - automatically created by the system to access the resource files
- User domains - domains added by the user to access the resource files.
¶ Domain management
You can Add, remove and Configure user domains. When you click the Add user domain button, a dialog for creating a new domain appears:
Specify a third-order or lower domain name.
Next, select the SSL certificate you want to apply to the domain from the drop-down list:
- Let’s Encrypt certificate (auto) - automatically created by the provider
- Custom certificate (user) - user-added certificate
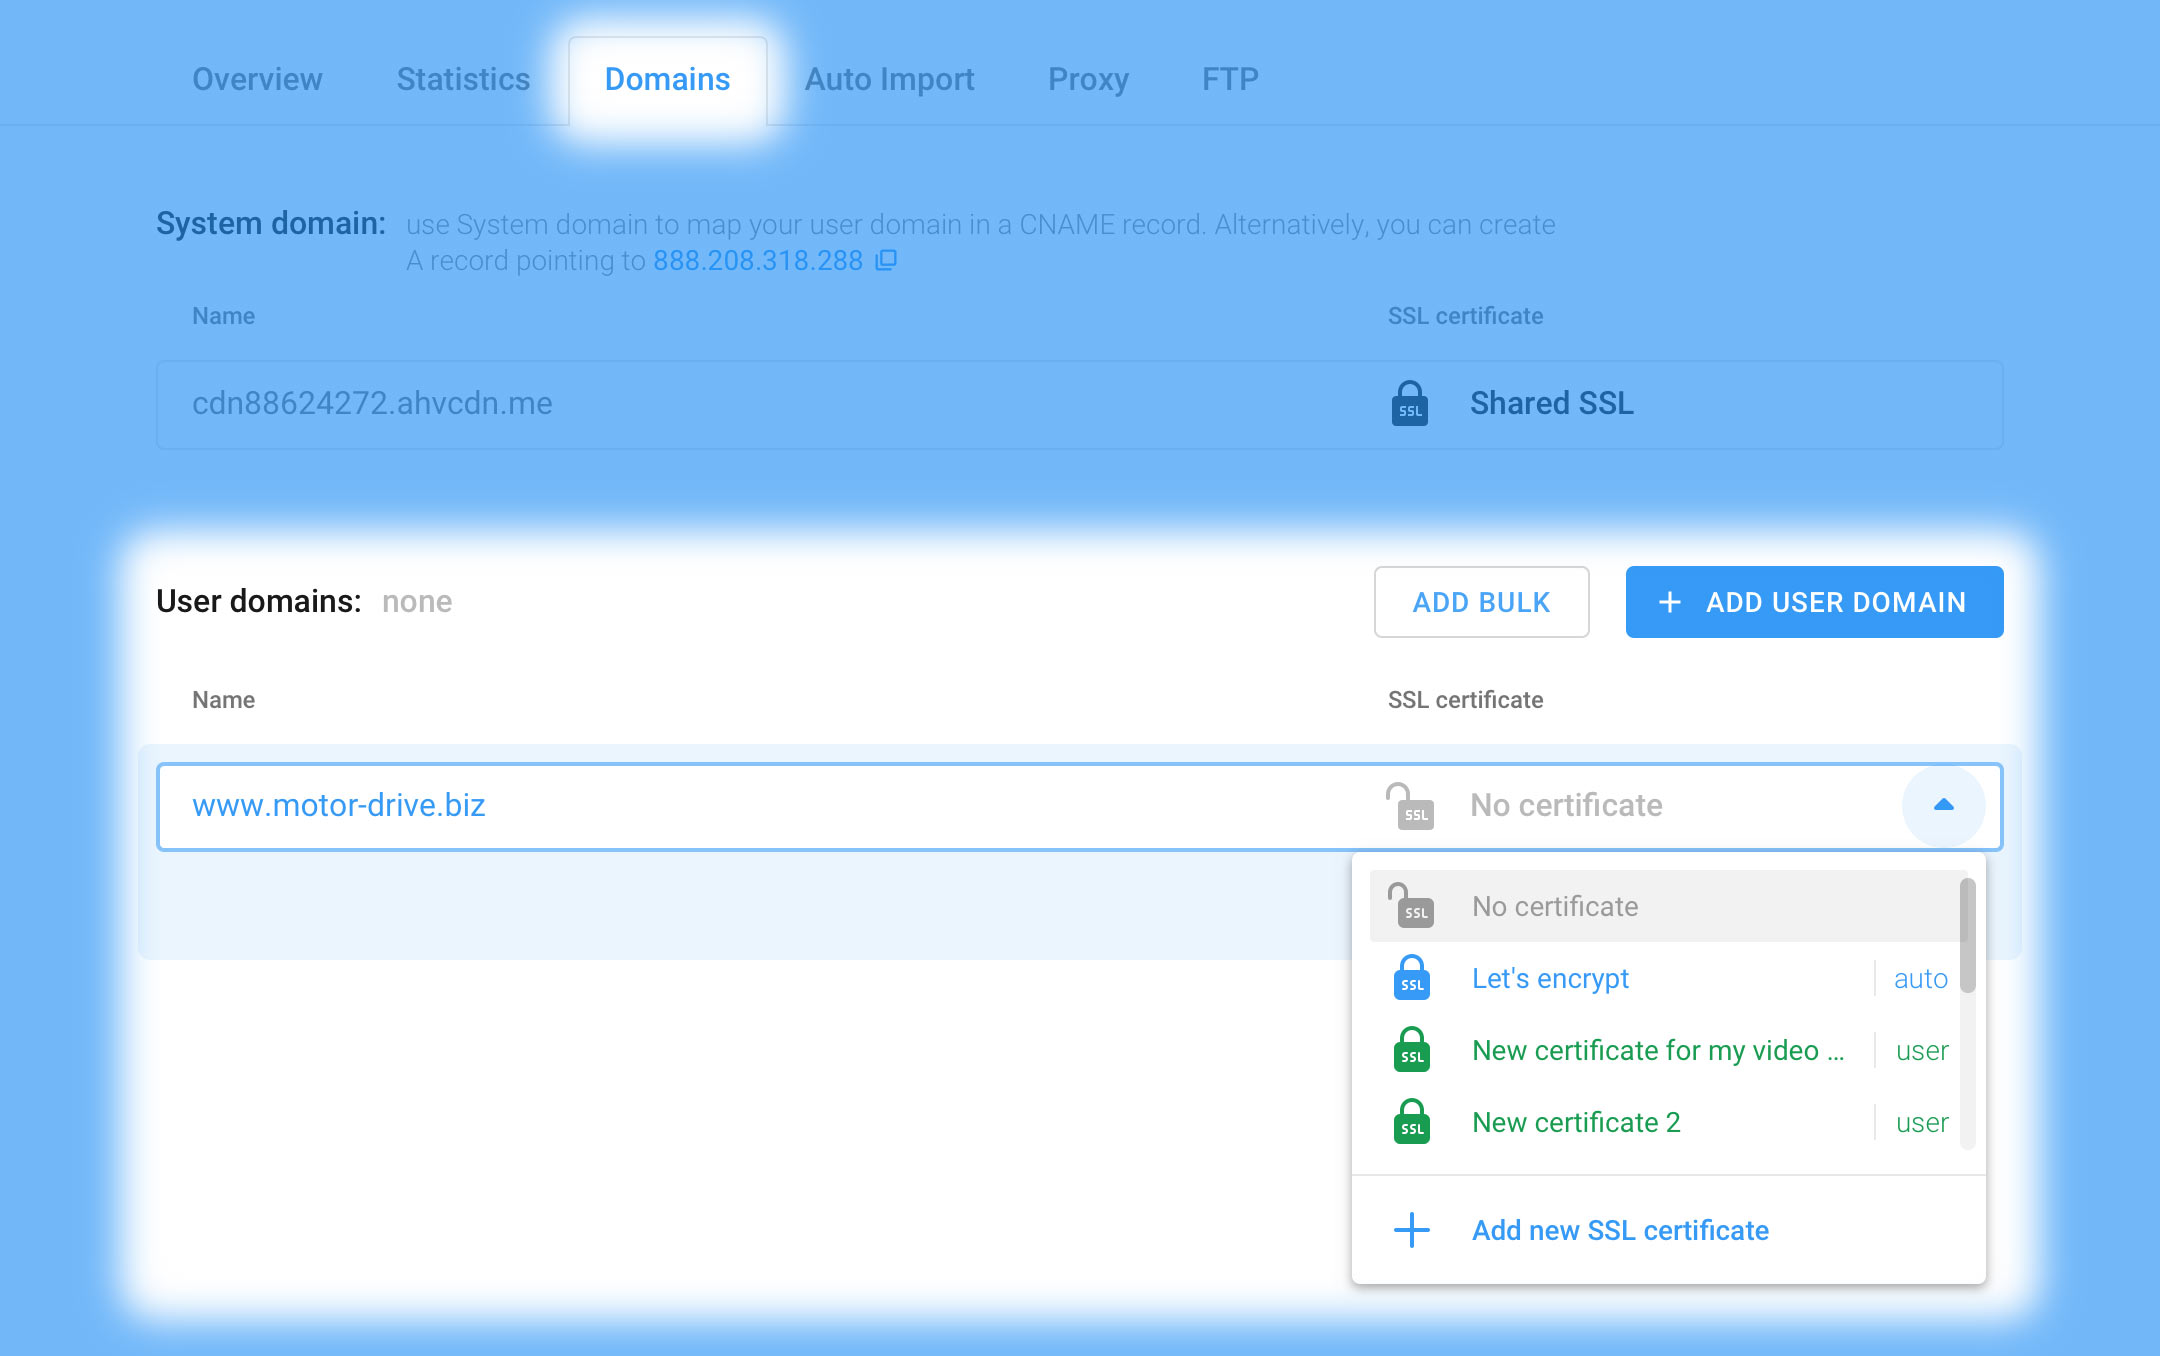
If the required SSL certificate is not listed, it must be added to be applied to the new domain. To add it, click Add new SSL-certificate in the certificate drop-down list.
You also can add a bundle of your domains at once, for this purpose use the ADD BULK button and specify all domains of this resource.
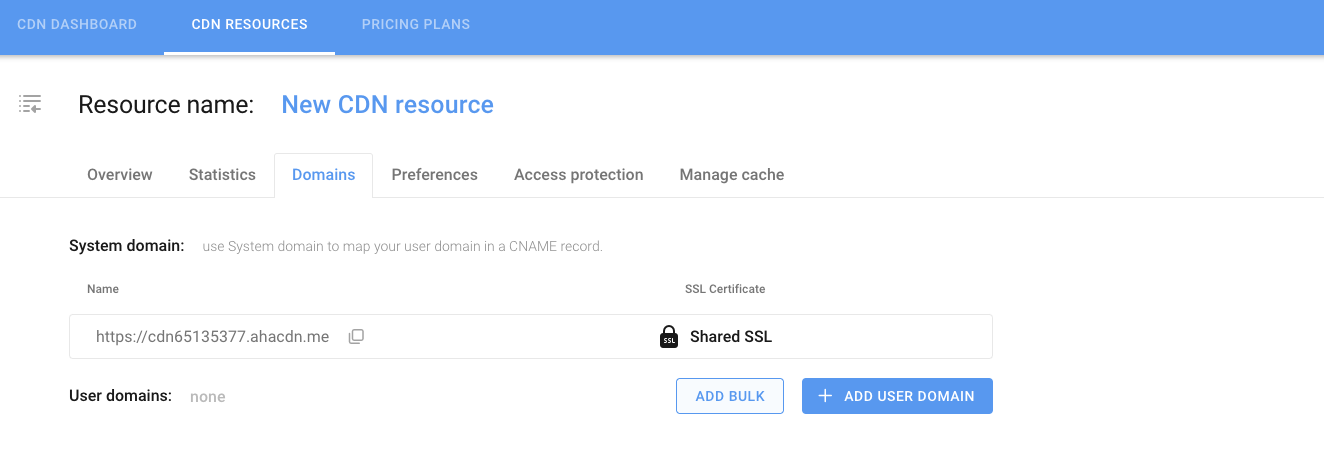
Here you can issue a Let’s Encrypt certificate in bulk for all added domains, or you can apply existing certificates that have already been uploaded to the user panel.
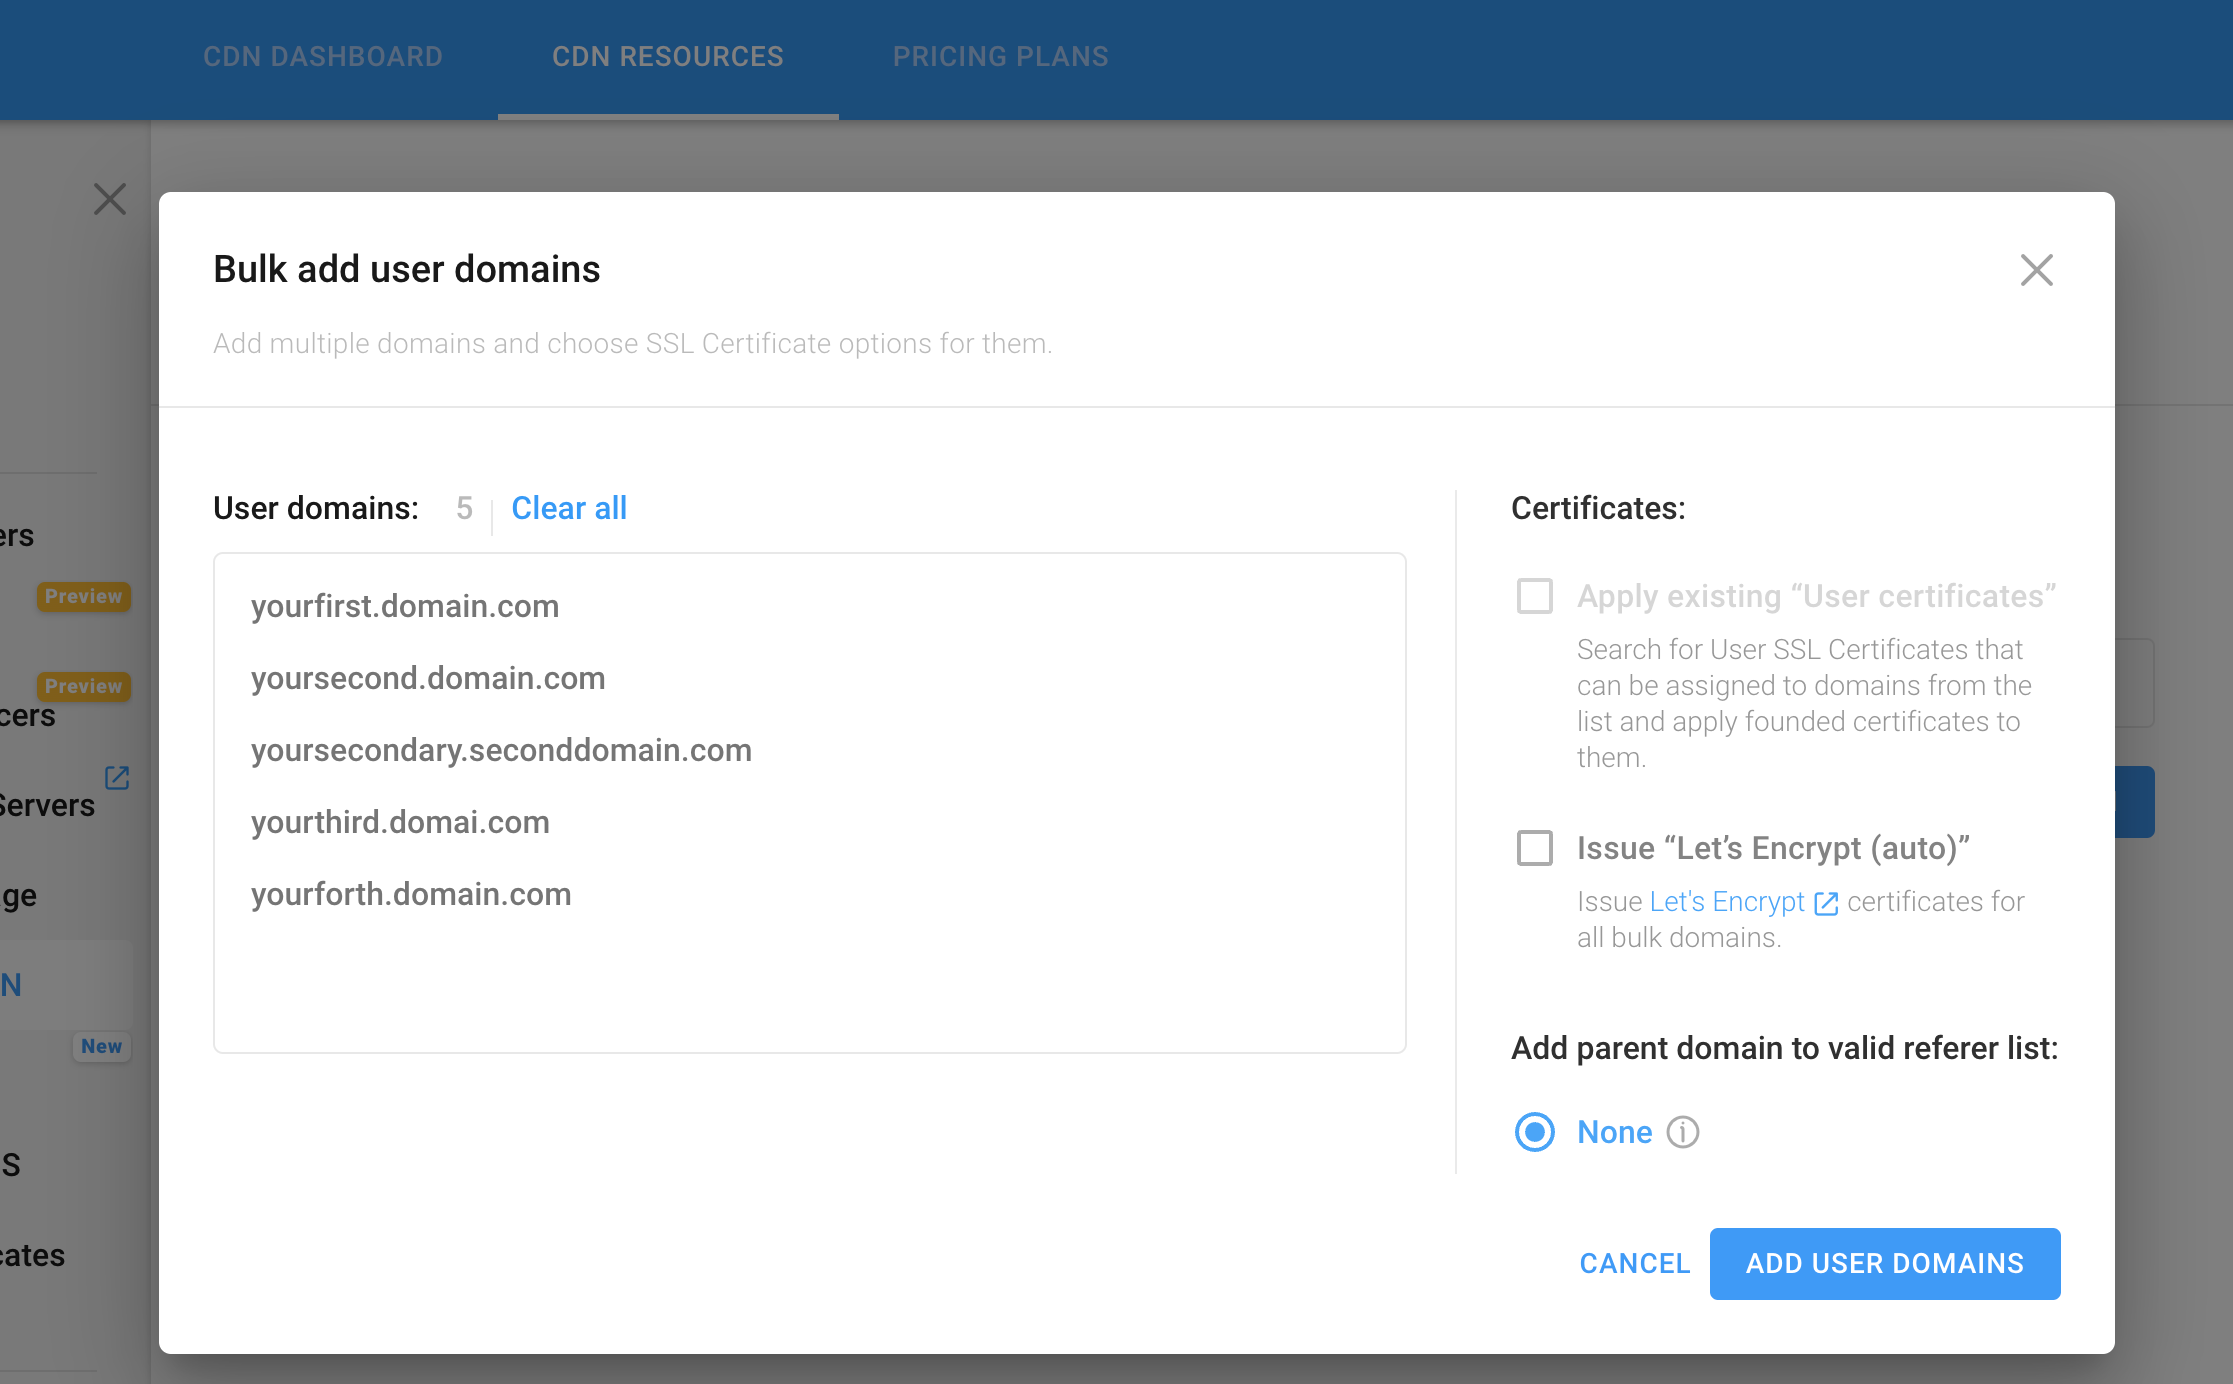
To confirm adding a list of domains, click Add User Domains.
¶ SSL-certificates
When selecting Add new SSL certificate from the drop-down list, you will be taken to the SSL certificates section of the user panel to add a new certificate.
**Only after entering all required data and saving it, the certificate will become available for selection in the drop-down list.
After clicking the Add domain button - the resource will be added a domain with preset (default) settings. The Cancel button cancels adding a custom domain.

¶ Content delivery settings
On the Preferences tab for each resource, you can configure such settings in any combination:
.png)
Note, using the originshield will result in increased CDN traffic.
¶ Origin shield
Enable the origin shield by setting Use origin shield setting to active. With origin shield enabled, only the shield server will contact your source server (origin) to generate its CDN cache. Other CDN servers will contact the shield server to build their own cache. This reduces the origin load.
The Origin (or the Source Server) — Your physical or virtual HTTP(S)-accessible server hosting the source directory with files you intend to distribute via the CDN, primarily designed to handle incoming requests. For example, the origin may host your website’s source code or content folders. Anycast CDN uses the source server to cache the original files and proxy requests for non-cached files.
There are two origin shild options available for you to choose from:
¶ ☑ Auto (Origin-based)
The auto option means that the CDN will utilize the server closest to your origin server as the shield-server.
¶ ☑ Custom (Multi-shield)
The custom option allows the CDN to use different shield servers for different geographic locations. When enabled, the location of available shield servers will be displayed in the user panel.
This will reduce the number of direct requests to the origin and ease the load on your source servers. The default origin shield location is determined automatically.
.png)
To select the preferred shild-server location manually, activate the origin shield, select the Custom option as shown above and activate the more geographically appropriate shild from those offered.
¶ IPv6 support
According to various sources, 97% to 99% of requests will come over IPv4.
Allow content to be sent to users over IPv6. With this setting enabled, users will be able to access your content over the more advanced IPv6 network protocol, which replaced IPv4.
This setting, among other things, can eliminate some connectivity issues. IPv6 is more compatible with mobile networks and more resilient.
To enable IPv6 support for the current resource, move the corresponding switch to the active position as shown below.
.png)
¶ HTTP-to-HTTPS
In the image above, automatic user redirection from HTTP to HTTPS is enabled. This setting provides a higher level of privacy and protection for the user. Note, this setting is disabled by default.
This setting is mandatory for SEO optimization of the web page.
HTTPS uses encryption by default when exchanging information between the user and the server, ensuring that third parties cannot decode the transaction even if they could intercept it in any way.
¶ Proxied extentions
By default, the function is disabled and the list of formats is empty.
If the content in your resources directory is diverse and not everything needs to be distributed via CDN, set the file types to be distributed via CDN here, as shown below:
.png)
Other extensions the CDN will not cache. When requesting file formats not listed, CDN will return a 403 error.
When this setting is activated, the list of extensions you specify overwrites the default list of proxied extensions.
To enable or disable any of the parameters above, move the corresponding switch to the active or inactive position. Each parameter’s status, On or Off, is displayed to the right of its name.
Also on this tab, you can view and edit the source of the resource set when it was created.
.png)
¶ Preferred IP-version
You can select the preferred origin connection IP version (IPv4 or IPv6) for the external URL as shown below.
.png)
In case the preferred version is unaplicable due to network configuration, hardware set-up, or other factors, the connection will default to the supported protocol version.
After making the necessary changes to the configuration, click Save Changes.
¶ Content access
On the Access Protection tab (access settings), you can restrict certain users from accessing your content via CDN.
The following settings, in addition to HSTS, will help you restrict unwanted activity, including hotlinking attempts.
.png)
To enable or disable any of the protection settings, move the corresponding switch to the active or inactive position. The status of each setting, On or Off, is displayed to the right of its name.
¶ Referrer check
Referrer settings: Here you can specify a list of domains that will be automatically allowed / denied access to this resource.
When using the “white” list, you can limit traffic for requests with a missing referrer. Your custom domains will automatically have access.
Empty, firewall or proxy wiped referrers, are allowed by default. You can overwrite this behavior by enabling blocking by the appropriate settings on the Allowlist tab highlighted below:
.png)
For Google subdomain referrers (google.* and *.google.com), you can use wildcard value.
¶ Regional limitation
Country protection parameter: зhere you can specify a list of countries for which your content will be available (Allowlist) or a list of countries whose users will not be allowed to access the content (Blocklist). To do this, select all required countries from the drop-down list.
Depending on whether you want to set a blacklist or whitelist, switch between the Blocklist or Allowlist restriction type, respectively.
.png)
¶ IP control
IP protection parameter: As shown above, you can set IP address blocklist or allowlist separated by commas, you. an also add the IP-mask to block or allow access here.
¶ HSTS
HTTP Strict-Transport-Security - is a mechanism to force a transition from HTTP to HTTPS protocol. You can specify a period of time for which the user’s browser will remember this setting (in days and hours), as shown below.
.png)
¶ CORS
Cross-Origin Resource Sharing - When CORS is activated, the CDN uses an additional header with a wildcard value, providing cross-origin access to your resource.
ccess-control-allow-origin: *
¶ Anti-Hotlinking
Content protection primarily resolves the hotlinking* problem, making it impossible (or significantly more difficult) to use your content on someone else’s site.
*hotlinking — using someone else’s content on the site or other platform without any rights to do so, for instance, by embedding in the site’s HTML code tags <img>, <video>, or similar referring to another site’s assets in order to save money on hosting and profit on other people’s content.
.png)
¶ URL signature
URL signatures are a crucial content security feature, particularly for hotlinking prevention. Our mechanism is comparable to the “NGINX Securelink” functionality but tailored for Anycast CDN setups.
By implementing URL signing, you can:
- Verify the authenticity of incoming requests.
- Prevent unauthorized resource access, even if they discover the URL.
- Limit the link lifetime to the exact period.
- Prevent link sharing between users, restricting access to certain user IPs.
¶ How URL Signing Works
When URL signing is enabled, each content request must include a signature that confirms it is authorized. The signature is generated using a specific data format, hashed with MD5, and checked against the CDN’s validation logic.
¶ Format
To create a valid signature, use the following data format before applying the MD5 hashing algorithm:
$expiration_date$uri$client_address $signing_key
¶ Components
$expiration_date: The expiration timestamp (in seconds or another agreed format) that limits the validity of the link. Once this time is exceeded, the link becomes invalid.
$uri: The Uniform Resource Identifier of the requested resource.
$client_address: The IP address of the client requesting the resource. This binds the signature to a specific client, adding another layer of protection.
$signing_key: A secret key shared between the server and the signature generator. This key ensures that only authorized parties can create valid signatures.
¶ Parameters
Secure link argument name — is mandatory if the option is enabled. By default is set to the MD5 hashing algorithm.
Signing key — your unique secret key, used to generate the signature and verify the link. It is mandatory. Value of under 10 alphanumeric characters is expected.
Check link expiration — arbitrary parameter. If enabled, limits link lifetime by adding an expiration timestamp to the argument. - boolean, default is true.
Expiration date argument — is used to send an expiration timestamp in Unix time format (seconds since 1970-01-01) default is expires, validation is the same as for the Secure link argument.
Check the client address — an arbitrary parameter, that checks if the URL signature is generated for the requesting address. By default is set to active.
Once you have configured all the necessary access settings, click Save changes.
¶ Cache Management
Note, disabling caching may result in reduced availability of your content and increased load on your servers as all traffic will be redirected to the source.
Navigate to the Manage cash tab of the resource page, to manage and fine-tune your Anycast CDN cache.
¶ Cache Purge
On this tab, cache purge is available to you to clear all cache or particular files/directories in order to force-fetch a current content version from your server. You can purge files selectively or all at once.
This action invalidates all the selected cached content across all edge nodes globally, fresh-fetching content from your server.
¶ Selective Cache Purge
By default, the cache purge is performed By path. To clear the respective cache individually or in bulk, enter the path or a list of paths. The full path to the files needs to be specified.
The CDN will more swiftly process a single task with multiple paths to purge, rather than a corresponding number of separate tasks to purge each individual path.
If there’s a need to purge the cache By the Path for a large number of resources, we recommend doing so via the API.
Click the “x” at the end of the row to delete a certain path string from the bulk input. Press Clear all to empty the input field altogether.
.png)
Confirm and proceed to purging by clicking the Purge Cache By Path button, as depicted above.
Beware, cache purge may cause temporary distribution latency and increased server load. We recommend scheduling the total cache purge during a period of low traffic.
¶ Total Cache Purge
Make sure this option is preferable.
.png)
To proceed with the overall resource cache purge, switch the radio button to Total and confirm by pressing the Total Cache Purge button, as shown above.
¶ Disabled Caching
By default caching is on for every Anycast CDN resource and it is recomended to keep it on. If caching is disabled, the CDN fetches content directly from your server for every request, bypassing edge caching.
This may cause higher latency, will significantly increased origin load, and reduce performance benefits provided by the CDN.
.png)
In case you need to disable caching for your resource, move the corresponding toggle into inactive position as depicted above and press Save Changes button at the bottom of the Cache management page.
Switch the toggle into the active position in order to enable caching again.
¶ Cache TTL
TTL (Time To Live)—the time the file copy exists in the cache. By default, all cache TTLs are 2 days with a maximum of 365 days. You can define TTL in days, hours, minutes, and/or seconds.
With enabled caching, when your content is first requested, Anycast CDN fetches it from your server and saves a copy of your file for future requests (caches it).
Cached content remains in the cache for as long as users continue to request it. You can configure how long the cache is viable until deemed inactive or outdated with the configurations below.
.png)
¶ Inactive TTL
Inactive TTL specifies the period after which the cached file that has not been requested will be deleted from cache.
¶ Active TTL
Active TTL defines the period after which the cached file will be re-fetched from the origin and updated in the CDN cache. If the file has not been updated on your server since caching, only the headers will be re-cached and the file will not be re-downloaded.
.png)
¶ Custom Active TTL based on HTTP codes
This feature allows to separate Active TTL durations for individual HTTP status codes. For instance, 200 (Ok) responses can have a longer TTL, while errors like 403 (Forbidden) or 404 (Not Found) can refresh more often to ensure accuracy.
You can customize these TTLs based on your content strategies.
.png)
¶ Custom responce codes
You can add other responce codes to assigne a TTL, press Add Your Own Code button, enter your custom code and define TTL or enable Active TTL of 2 days with the toggle. Press Save Changes to confirm.
.png)
The default 60-second TTL is in place for the error codes* unless explicitly overridden by the user in the settings above.
¶ Error codes with 1 minute TTL*
401 (Unauthorized), 403 (Forbidden), 404 (Not Found), 429 (Too Many Requests), 451 (Unavailable for Legal Reasons), and 5xx (Server Errors: 500, 502, 503, 504).
¶ Browser Active TTL
Browser Active TTL determines, how long the file will be stored in the browser’s cache.
Anycast CDN returns the headers, and the user’s browser utilizes its own cache for your content accordingly to the values you set here.
.png)
¶ Additional cache settings
Min requests to cache — As shown on the picture above, you can change the amount of file requests before the file gets cached. Until that request amount is reached, each request is redirected to the origin server to be served directly and CDN is not caching the file. Default and recommended value is 1 as pre-set and the maximum is 10 requests.
¶ Headers override
If you add the following headers when distributing files:
- X-Accel-Expires
- Expires or
- Cache-Control
the Override by response header params setting will allow you to override the TTL parameters set for the resource.
By default, headers are managed by the CDN, enable this feature if you want to inherit the origin’s headers.
When Override by response header params is enabled, the previously set Active TTL (Update Time To Live) and Browser Active TTL parameters for the resource will not be honored.